.png?width=200&height=150&name=campspotlogo2019%20(1).png)
Summary:
Elevate your campground's retail ancillary revenue with Campspot's dynamic feature: Online Store Add-Ons. Tailored to enhance guest experiences and maximize revenue streams, this feature accommodates parks with varied Point of Sale (POS) offerings. This guide outlines the necessary steps for setting up and utilizing this feature, ensuring seamless integration into your campground operations.
Step-by-Step Instructions:
Learn more:
View the video found here for more understanding on the process provided below.
Step 1: Add Inventory Items to Location
The first thing we need to do is make each item available for a preset Location in your POS setup, "Online Store Add-ons."
- Navigate to Point of Sale.
- Click on the Inventory tab.
- Select the Products page.
- Click on the desired item for Online Store Add-ons.
- On the Item Detail page, select the "Online Store Add-ons" location in the Locations section.
- Save to enable the item for online sale.
The clip below shows the steps listed above.
.gif?width=600&height=334&name=ezgif.com-gif-maker%20(33).gif)
Step 2: Enable Add-ons for your desired Site Types
- Navigate to Campground Setup
- Click on the Unit Setup tab.
- Choose the Site Type Category.
-
Choose the Site Type Category relevant to your needs.
-
Click the checkbox next to the desired Site Type.
-
Click the Edit button at the top.
-
On the Edit Screen, locate the Online Store Add-ons Allowed section.
-
Enter the Online Store Add-ons being added to the Site Type.
-
Save changes
-
Repeat 1 - 5 for each Site Type.
Please Note: A maximum of 10 inventory items per Site Type can be added to sell as Online Store Add-ons.
The clip below shows the steps listed above.
.gif?width=600&height=318&name=ezgif.com-gif-maker%20(34).gif)
Step 3: Map Financial Accounts
- Navigate back to Point of Sale.
- Select the Accounting tab.
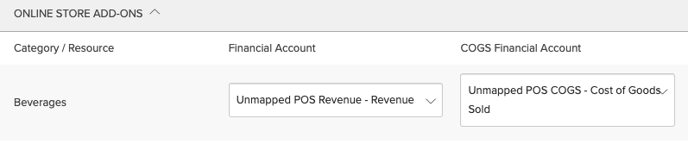
- Click the ONLINE STORE ADD-ONS drop-down from the list.
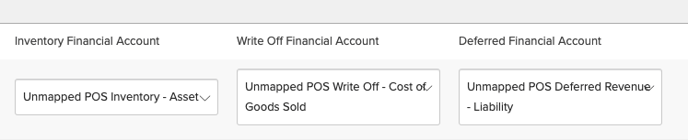
- Select the appropriate Financial Account, COGS Financial Account, Inventory Financial Account, Write Off Financial Account and Deferred Financial Account for each item that is configured to sell as a Point of Sale Reservation Add-on.
Please Note: If your park does not have custom financial account mapping setup for your other Point of Sale Inventory items, you can map each account the corresponding system account. Click here to learn more about Re-mapping Financial Accounts.
The images below show an example of the mapping of one item in the ONLINE STORE ADD-ONS Location.
Most Common FAQ:
Q: How many inventory items can be added as Online Store Add-ons per Site Type?
A maximum of 10 inventory items can be added for each Site Type.
Q: Can I enable Online Store Add-ons for multiple Site Types simultaneously?
Assigning Online Store Add-ons to Site Types is done one Site Type at a time. Follow the directions provided in Step 2 for each Site Type.
Q: Are there specific financial accounts required for mapping Online Store Add-ons?
Yes, ensure to map COGS, Inventory, Write Off, and Deferred Financial Accounts for each configured item.
Q: What if my park doesn't have custom financial account mapping for Point of Sale items?
You can map each account to the corresponding system account.
Q: Where can I find a visual guide for adding inventory items and enabling Online Store Add-ons?
Refer to the provided clips in the respective sections for a step-by-step visual walkthrough.