.png?width=200&height=150&name=campspotlogo2019%20(1).png)
Summary:
Follow this guest to quickly connect a Credit Card Terminal to your park's Admin Site.
Step-by-Step Instructions:
Step 1: Complete Initial Setup Requirements for your Terminal
Setting up your credit card terminal is a crucial first step to ensure smooth transactions. As terminals may vary, visit our Terminals page to find specific setup instructions for your device.
Upon successful completion, your terminal should display "Bolted" or "Connected."
Please Note:
Ensure the terminal reads "Bolted" or "Connected" before proceeding to Step 2.
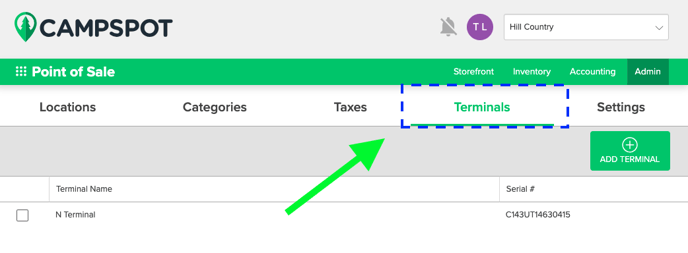
Step 2: Go to Point of Sale Admin
- Navigate to Point of Sale
- Click on the Admin tab
- Select Terminals
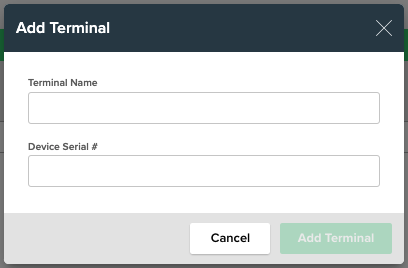
Step 3: Adding a Terminal
-
Terminal Name:
-
Assign a unique name to easily identify the terminal when processing a payment. This name will appear in a drop-down for users to select.
-
For example: Office, Front Desk1, Front Desk2, Store, Cafe.
-
-
Device Serial #:
-
Enter the Device Serial #.
-
Location of the Serial # may vary by terminal but can typically be found on the screen or on the bottom of the device.
-
Most Common FAQ:
Q: What if my terminal doesn't display "Bolted" or "Connected" after setup?
Revisit Step 1 to ensure successful initial setup. If issues persist, contact Campspot Support for assistance.
Q: Can I add multiple terminals?
Yes, use the unique Terminal Name to distinguish between multiple terminals during the payment process.
Q: Where can I find the Device Serial # on my terminal?
The location may vary, but commonly, it's on the device's screen or bottom. Check your device's manual for specific details.
Need Additional Support?
If the pairing was unsuccessful, repeat step 1 to ensure the device is Bolted. If the device is Bolted and will not pair with Campspot, contact Campspot Support.
Learn more! Click on the link below: