.png?width=200&height=150&name=campspotlogo2019%20(1).png)
Summary
In this article, we'll guide you through the efficient handling of reservations marked as No Shows. Front desk employees can use the information here to ensure a seamless process and improve guest relations.
Uses
- Guest Communication: Improve guest relations by proactively communicating with guests about their No Show status and explaining relevant policies.
- Streamlined Reporting: Mark reservations as No Show to streamline reporting for property decision-makers, aiding in data accuracy and analysis.
- Fee Application: Understand the essential steps to cancel a reservation after marking it as No Show, allowing for the application of applicable fees and freeing up the site for future bookings.
Communicate with Guest
Any reservation from a previous day that has not been checked in will remain on the Arrivals List found on the Front Desk tab of the Booking page. Before updating reservations in your Admin Site, you may want to consider:
- Contact the guest to verify if their trip has been canceled and explain the No Show reservation policy.
- Add notes to the Reservation Notes section of the Reservation Summary to document any important details and questions regarding the No Show cancellation.
Update Reservation
To successfully update a No Show reservation, follow these two essential steps:
- Mark reservation as a No Show
- Cancel the reservation
Step 1: Marking a Reservation as a No Show
Campspot enables users to mark reservations as a No Show, streamlining reporting for property decision-makers.
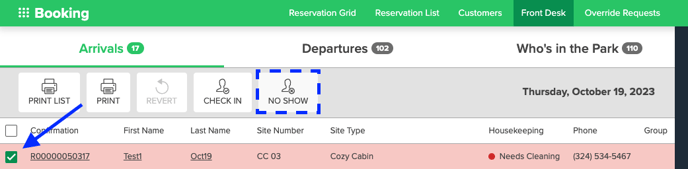
To mark a reservation as a No Show:
- Navigate to the Booking page
- Click on the Front Desk tab
- Select the Arrivals list
- Check the box in the front of the reservation(s)
- Click the No Show button, now available at the top of the list
Please note - This process alone does not change the reservation status to cancelled or free up the site. The next step in the process must also be completed.
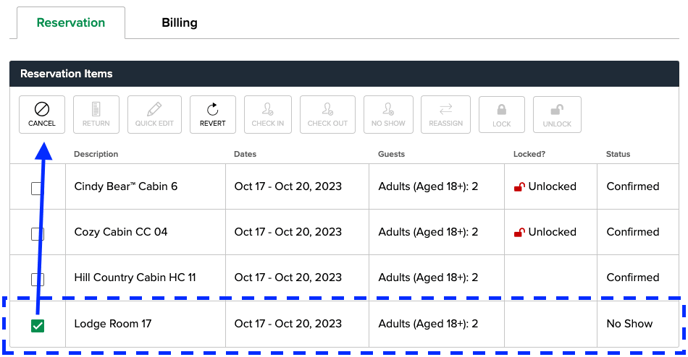
Step 2: Cancelling the Reservation
After marking a reservation as No Show, it will move to the bottom of the Arrivals List with a lighter grey text compared to other arrivals.
The next crucial step is to cancel the booking, allowing any applicable fees to be applied and the site to be freed up for other bookings.
- Click on the Confirmation number to open the Reservation Summary
- In the Reservation Items list, locate the applicable Site Type(s) you wish to cancel. If the first step was successful, the status of the Site Type(s) will be "No Show."
- Check the box in front of the Site Type
- Click on Cancel button at the top of the list
- Verify billing based on your park's No Show policy to complete the process efficiently
By following these steps, you can handle No Show reservations with ease, ensuring smooth operations and improved guest satisfaction.