.png?width=200&height=150&name=campspotlogo2019%20(1).png)
Summary:
Unlock the power of event management with Campspot's Consumer Site Admin Events feature. This article provides step-by-step instructions for adding, updating, and deleting events on your park's Consumer Site, empowering you to drive engagement and boost attendance for special occasions.
Uses:
- Promote Special Events: Showcase themed weekends, holiday celebrations, and local festivities to attract guests and generate excitement.
- Drive Engagement: Keep guests informed and engaged by publishing event details, dates, and enticing descriptions directly on your park's Consumer Site.
- Enhance Planning: Maintain a comprehensive event history for future reference, facilitating strategic planning and ensuring seamless event management.
Create Buzz for Your Park's Special Events with Campspot
Planning a special event at your park? Excite your guests and generate business by showcasing it on your park's Consumer Site using Campspot's Events feature. Whether it's a themed weekend, holiday celebration, or local festivity, this tool is your ticket to driving engagement and boosting attendance.
How to Manage Events
Follow the steps below to manage Events by:
Step-by-step Instructions:
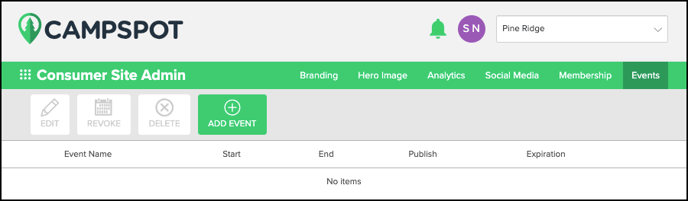
Step 1: Navigate to the Events page
- Navigate to the Consumer Admin Site setup page.
- Select Events tab.
- From this page you can add new, update, or delete events.
Step 2: Add Event
- Click on the Add Event button
- Complete the form
- Click Save Changes in the bottom right-hand corner.
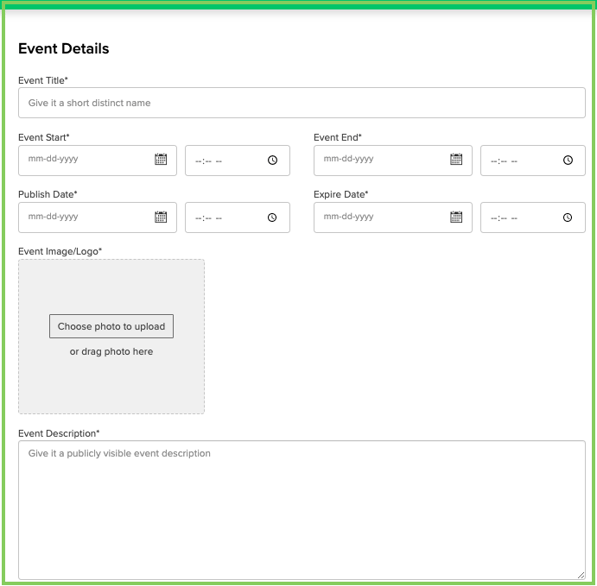
| Event Title | Shows on Consumer Site, so should be guest facing. |
| Event Start & End Dates / Times | |
| Publish Date / Time | When should this event be published to the Consumer Site? |
| Expire Date / Time | When should this event no longer be visible on the Consumer Site? |
| Event Image / Logo | Pictures are worth a thousand words, use a photo to capture the excitement of this event. Select a photo to upload from your computer by either Choose photo to upload or dragging a photo into the grey box. |
| Event Description |
Also guest facing, this description should be used to create excitement about this event while answering questions about the event. Pro Tip: You can also use this space to provide a promo code if you decide to apply a promotional package to this event. (Click here to learn more about Promos and Packages) |
Update an existing Event
- On the Events page, check the box in front of the Event
- Click the Edit action button
- The Event form will open. update the relevant fields.
- Click Save Changes once complete.
Permanently Delete Event
- On the Events page, check the box in front of the Event.
- Click the Delete button.
Best Practice:
When managing events, it's crucial to consider the long-term impact of deletions. Once the "Delete" action button is clicked, there's no way to undo the deletion, and the system won't retain a list of inactive events.
To maintain a comprehensive event history for future planning, follow these guidelines:
-
Use the Revoke button:
-
Opt for the "Revoke" button instead of deletion. This action updates the event's expiration date to one day prior to the current date, effectively removing it from public view without erasing it entirely from the system.
-
-
Manually Update the Expiration Date:
-
Take control of your event records by manually adjusting the expiration date. This ensures that past events remain accessible for reference and planning purposes, facilitating seamless event management and strategic decision-making.
-