.png?width=200&height=150&name=campspotlogo2019%20(1).png)
Summary
This guide offers a detailed walkthrough for successfully splitting reservations, allowing guests to seamlessly transition between sites during their stay. Addressing the intricacies of creating multi-site reservations with staggered dates, it covers updating existing sites, adding new sites, and troubleshooting common issues.
Splitting a reservation is done when a guest starts their stay on one site and moves to another part-way through their reservation. To complete this task, you will create a multi-site reservation with staggered dates.
Uses
-
Efficiently update and reconcile existing site reservations for date changes.
-
Add new sites to existing reservations, ensuring a smooth transition for guests.
-
Troubleshoot common issues related to changing checkout dates, outstanding balances, and campground rules.
-
Gain insights into using Overrides and Quick Edits to overcome rule-related challenges.
-
Verify and adjust rates, providing clarity on outstanding balances and rate changes.
Instructions
Step 1: Update Existing Site
The first step is to update and reconcile the existing site to reflect the "check out" date or the move date.
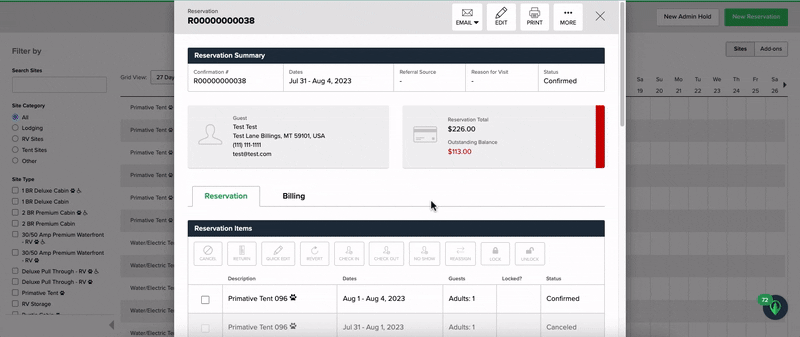
1. On the Reservation Summary, click the checkbox in front of the original site reservation in the Reservation Grid.
2. To edit the dates of the site, you can either select the Edit (Step 1a below) button at the top of the page or use the Quick Edit (Step 1b below) button at the top of the Reservation list. (Directions for both are below).
3. Check Out the original site.
Please Note: A site cannot be Checked Out if a balance is owed to the campground, but it can be checked out with a balance owed to the guest. Steps 2 and 3 will assist in reconciling.
Step 1a: Reservation Summary Edit button to edit dates
- After checking the box in front of the original site, click on the Edit button at the top of the Reservation Summary.
- In the Edit Screen, change the checkout date to the date of the site move.
- Click on the on the current site from the Future Site grid. (see note about Overrides below)
- Click Finalize Edits
- In the Confirm Reservation Edit dialog box, click Submit to accept the new site.
- Check out the original site.
(See the screen share recording below - no audio)
Step 1b: Use Quick Edits to edit Dates
1. After checking the box in front of the original site, click on the Quick Edit button at the top of the Reservation Items List.
2. Change the checkout date to the date of the site move
3. Click Continue (see note about Overrides below)
4. In the Confirm Reservation Edit dialog box, click Submit to accept the new site.
5. Check out the original site.
(See the screen share recording below - no audio)
Step 2: Add New Site to the Reservation
The second step is to add the new site to the existing reservation.
1. From the Reservation Summary, find the Reservation Items list.
2. Click the box in front of the site the guest is currently on.
3. Click Edit at the top of the Reservation Summary - you will be navigated to the Edit Page.
(See the screen share recording below - no audio)
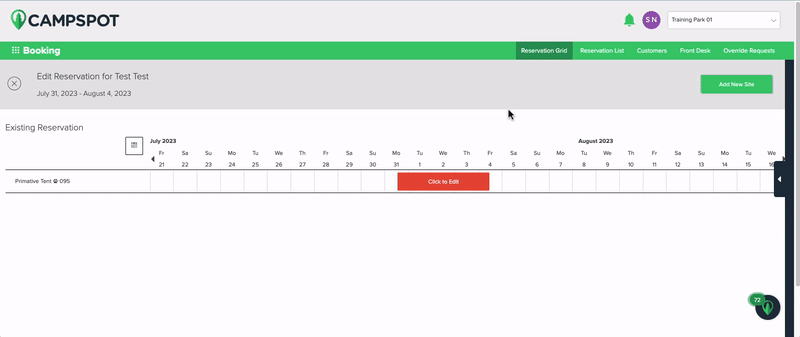
4. Once on the Edit Page, click the green Add New Site button in the right-hand corner of the screen
5. Select the Check In and Check Out Dates.
**The Check In date would be the day of the move.**
6. Put the same number of adults, children and pets as the original reservation.
7. Select the Site Type of the new site.
8. Select the New Site from the Select Site to Add grid
9. In the Confirm Reservation Edit dialog box, click Submit to accept the new site
(See the screen share recording below - no audio)
You will automatically be redirected back to the Reservation Summary. The new site will appear in the Reservation Items List.
10. Check In the new site by checking the box in front of the Site in the Reservation Summary's Reservation Items list and selecting Check In.
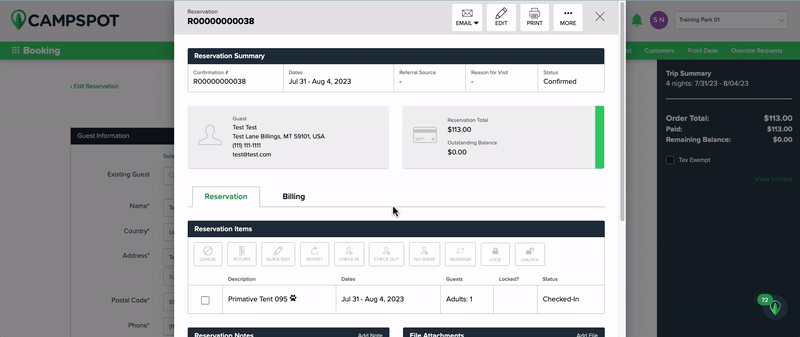
Step 3: Reconcile Balance Adjustments
After checking out the original site and adding the new site, you may see an Outstanding Balance. There are a few options available to reconcile this balance, depending on the situation. Choose the approach that best fits:
- Charge /Refund the Guest:
- Charge: If the guest has agreed to pay the difference for a more expensive site, you can reconcile by charging the guest the balance.
- Refund: If the new site is less expensive, refund the balance to the guest.
- Manual Rate Changes:
- If the new site has a different rate, you can update the rate in the Billing Click the three dots next to the nightly rate to adjust the rate manually.
Make sure the balance is brought back to $0 before closing the reservation to avoid any future issues.
Troubleshooting
Q: When I Edit the original site to change the Check Out date, the site does not show up - how do I overcome this?
Each campground has rules in place within Campspot that may be impacting the search results. If you use an Override, you will be able to see the original site from the search results.
The same is true if you are using the Quick Edits feature to change the Check Out date.
The screen recordings above do show how the Override feature is used to overcome the rules.
Q: There is an outstanding balance?
If you have an outstanding balance, first ensure that the original site has been adjusted to reflect the new Check Out date.
Double check that the first step was completed and any balances reconciled within Step 1.
If there is still a balance at that time, there could have been a change in rate on the new Site.
Verify the rate paid per night on the original site and make adjustments to the new site - both of which are done by looking at the Billing tab of the Reservation Summary.