.png?width=200&height=150&name=campspotlogo2019%20(1).png)
Summary
This guide walks you through the process of making sites available on the Reservation Grid when guests depart early, covering the essential steps of editing check-out dates. Additionally, it provides comprehensive insights into handling overpaid money, offering options such as refunds, Camp or User Credit retention, and manual adjustments for cancellation fees. Learn how to manage these scenarios efficiently and maintain clarity in your reservation invoices.
Uses
- Open up sites on the Reservation Grid by editing check-out dates, accommodating guests with early departures.
- Effectively manage overpaid money resulting from changes in reservation costs due to date edits.
- Learn how the system may auto-generate cancellation fees and how to apply applicable refunds
- Learn the process of manually adding early departure fees to reservation invoices using Miscellaneous Charges.
- Understand the manual adjustment of invoice pricing to reflect original costs after check-out date changes.
- Enhance clarity in reservation invoices, ensuring transparency in financial transactions.
- Gain proficiency in handling early departure scenarios and associated financial adjustments.
Instructions
Opening Up a Site on the Grid
When a guest requires an early departure date, the site they were occupying can be booked by another guest after it becomes available on the Reservation Grid.
The reservation check-out date must be edited in order for the spot to become available on the grid. To learn how to Edit a reservation and change the check-out date, [WATCH HERE].
Tip: Changing a Reservation to Checked-out status will not free up a Site on the Reservation Grid. The check-out date must be edited.
Options For Overpaid Money
When a guest has paid for a reservation and then changes the reservation check-out date, in most cases, the edits will change the cost of the reservation. This cost change typically results in an overpayment on the reservation due to the decrease in the invoice total. When this happens, you have the following options for the overpayment:
- Refund your guest
- Retain the money in Camp or User Credit to be used for a future stay
- Retain the money as a cancellation fee (manually calculated by Cancellation & Payment Policy settings)
- Manually increase the rates on the invoice to keep the money on the reservation
Regardless of the option you choose, edits to the reservation invoice will be necessary. Before making invoice edits, have the option you'd like to choose in mind.
Refunding or Retaining the Money for a Future Stay
Refund your guest: To refund money to your guest, follow the standard refunding procedures. To learn more about refunds, watch [this video] on our support site.
Retain the money in Camp or User Credit for a future stay: To retain the money for a future stay, make a refund to your preferred method of either User or Camp Credit.
Please note: If the money is not refunded and is left on the reservation, the system will automatically move it to User Credit the next day.
Manually Adding an Early Departure Fee
If your parks procedure is to retain funds not already defined in the Cancellation and Payment Policies, you have the ability to manually add additional fees to the booking.
A manual early departure or manual cancellation fee are added to an invoice using a Miscellaneous Charge. Learn how to create Miscellaneous Charges [HERE].
To manually add a cancellation fee to an invoice:- Navigate to the reservation's Billing tab.
- Scroll down to Invoice Detail.
- Click the green + Add New Charge button.
- Enter the amount of the early departure fee and click save.
- The fee can be entered as any amount you choose, including the exact amount of the overpayment.
The clip below shows these steps.
Tip: Editing a reservation's check-out date does not automatically make a cancellation fee apply. Any fees must be manually added to the invoice.
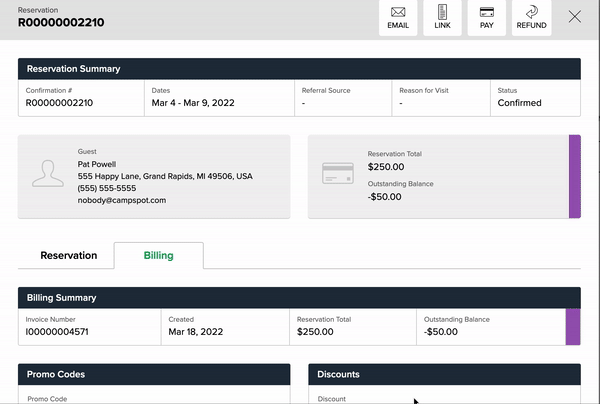
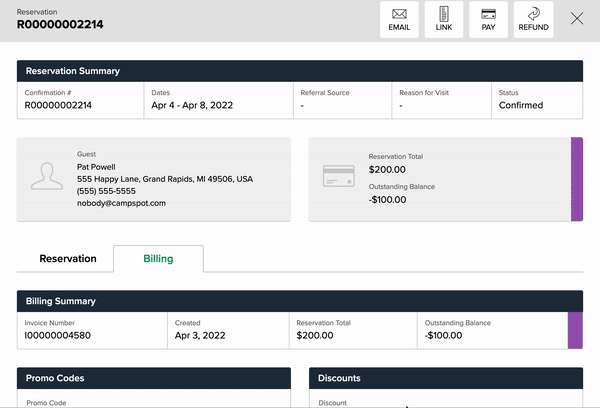
Manually Increasing Invoice Pricing
To manually increase the cost of the Site nights, navigate to the reservation's Billing tab, scroll down to Invoice Details and click the three green dots next to the price of the Site nights.
Here you can change the price to what it was before the reservation check-out date was changed.
The clip below shows a reservation that had a $100 decrease after the check-out date was changed. The cost of the new number of nights was then increased by $100 to get the reservation back to its original price.
Tip: Editing the cost of the Site nights will not make the invoice explicitly show that the money is being retained as a fee.