.png?width=200&height=150&name=campspotlogo2019%20(1).png)
Summary:
Adding a new site type in Campspot is a straightforward process that enhances your campground's offerings. Follow the steps below to efficiently set up a new site type, ensuring a seamless integration into your reservation system.
Uses:
- Enhanced Offering: Expand your campground's variety by creating new site types tailored to your unique offerings, providing guests with diverse options.
- Detailed Customization: Tailor each site type with specific details, such as amenities, accessibility, and pet-friendly options, providing a comprehensive overview for potential guests.
New to Site Management? Check out these articles as well:
Step-by-Step Instructions:
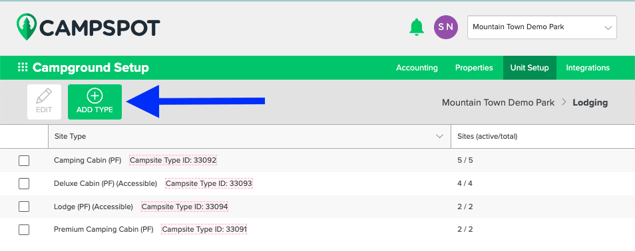
Step 1: Navigate to Unit Setup
- Navigate to Campground Setup.
- Select the Unit Setup tab.
Step 2: Add Site Type to Site Category
- Click the preferred Site Category (Tent, Lodging, RV Sites or Other).
- Click the Add Type button.
Step 3: Complete the New Site Type form
- Fill out the form to meet your specifications. Required fields will be indicated with a red asterisk. These must be filled out to complete this process.
- Click the Save Changes button.
| Is Active | Check this box to indicate that the site is active and ready for bookings. |
| Name |
Assign a easily identifiable Site Type Name. **Please Note: This name will be guest-facing.** |
| Display on Consumer Site with Icon | Select whether Pet Friendly and/or Accessible should display on your Consumer Site. |
| Amenities |
Select the Amenities available on the site. Learn more by checking out the tip below. |
| Daily Add-Ons Allowed |
Select the Daily Add-Ons available for booking alongside the Site Type reservation. Learn more about Daily Add-Ons here. |
| Online Store Add-Ons Allowed |
Select the Daily Add-Ons available for booking alongside the Site Type reservation. Learn more about Online Store Add-Ons here. |
| Description | Paint a picture of the Site Type for both your guests and staff to understand the value of each of your unique Site Types. |
| Invoice Message |
Include an Invoice Message to share with a guest if there is specific details they need to know about booking this Site Type. |
| Accounting |
Select the Financial Accounts the revenue for this Site Type should be reported. Learn more by checking out the tip below. |
|
Main Image Floorplan Slideshow |
Click the Choose photo to upload button to upload a photo to any of these categories. Learn more about Managing Site Type Images here.. |
Pro Tips & Additional Resources:
- Amenities: Assign common amenities to all sites within a Site Type in this section. Individual sites can be adjusted for any notable differences in amenities.
- Learn more about Managing Available Amenities here.
- Accounting: Ensure alignment with your preferred accounting method by selecting how these accounts report (Cash or Accrual Basis Accounting). These accounts determine the revenue "bucket" for Site Types.
- Learn more: If your preference is to report revenue by other Custom Accounts, check out these resources:
Step 4: Assign Sites, Rules and Pricing to your New Site Type
To make your new Site Type available for bookings, follow these additional actions:
Best Practice:
Before proceeding, consider implementing a rule to temporarily halt any bookings for this Site Type until all necessary actions are completed.
- Click here to learn more about the Cannot Be Reserved Online Rule.
| Assign Sites | |
|
Add Site Type To All Applicable Rules |
Update your existing Admin Site Rules to include the new Site Type or create new rules if needed. Ensure all rules are considered before making the Site Type available for bookings. Learn more by checking out the Tip below. |
|
Update Base Pricing |
Newly created Site Types are not automatically included in existing Base Pricing. Learn more on How To: Add Base Pricing for a New Site Type. |
Pro Tips & Additional Resources:
Add Site Type to All Applicable Rules: Ensure your new Site Type has all applicable rules assigned. Critical rules include:- Occupancy: Min/Max Age Groups
- Pricing: Occupancy-based Fees
- Pricing: Taxes
- Policy: Cancellation Policy
- Policy: Payment Policy
Don't stop there! Click here to learn what other rules are available in your Admin Site.