.png?height=120&name=campspotlogo2019%20(1).png)
Elevate your guests' POS experience by utilizing Charge to Site.
Summary:
Improve your guests' Point of Sale (POS) experience effortlessly with the Charge to Site feature. Discover how this widely-used functionality enhances the purchasing process and why it's a game-changer in the hospitality industry.
Charge to Site: Simplifying Transactions
Rather than requiring guests to provide a credit card for each retail purchase, Charge to Site offers a seamless alternative, a common practice in leading hospitality businesses. Elevating your park's offerings, this feature excels in:
- Enhancing Guest Convenience
- Increasing On-Site Spending
- Encouraging Additional Purchases
- Streamlining Payment Processes
- Unlocking Revenue Opportunities
- Optimizing Operational Efficiency
Step-by-Step Instructions:
Step 1: To add a Customer to a Sale
After adding products to the POS Shopping Cart / New Receipt:
-
From the Storefront Receipts section, click Search Customers with Reservations.
- Please Note: Charge to Site can only be used for customers with checked in reservations.
-
Use the search fields to find the guest using First / Last Name, Site Type, or Site Name/Number.
-
Available matches will show below the search fields. There may be multiple search results available.
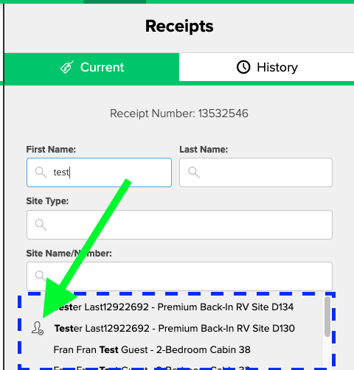
- Hint: Reservations that are checked in will include the icon seen above.
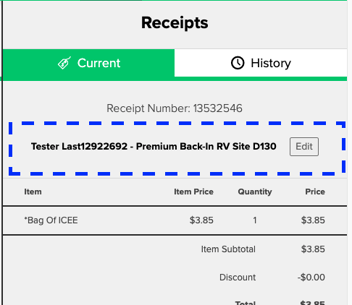
- Find and select the guest from the list. The selected profile will be highlighted.
- Click the green Add button.
Best Practice:
Prior to proceeding with a Charge to Site transaction, it is crucial to verify the guest's details. Upon completing the search, you will find essential reservation information, including First/Last Name, Site Type, and Site Number.
We highly recommend utilizing this information as a verification step for the customer completing the POS transaction. This ensures accuracy and confirms that the correct reservation has been selected, fostering a smooth and error-free transaction process.
Step 2: Pay with Charge to Site
-
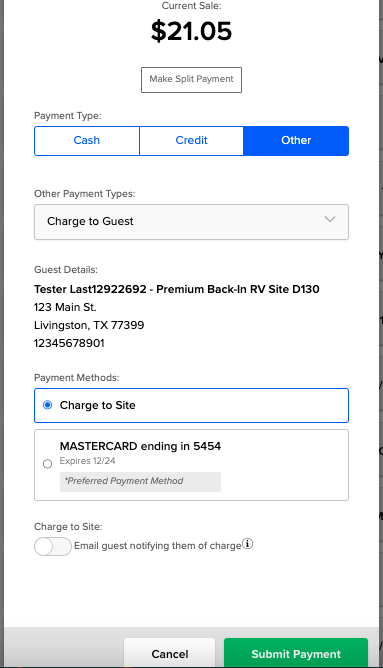
Click the Payment Type: Other button.
-
Select Charge to Guest from the Other Payment Types drop down menu.
- Click Charge to Site as the Payment Method
- Select whether to "Email Guest Notifying them of charge" or not.
-
Click the green Submit Payment button.
 Select Print Receipt
Sales Receipt: Charge to Site
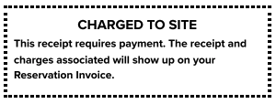
After completing a Charge to Site transaction, guests will see a message at the bottom of their receipt:
Troubleshooting: Charge to Site is Not an Option
The charge to site payment type works for checked-in reservations only. A checked-in customer’s site number will display next to their name when adding to a sale. A customer can be checked in from the reservation tab of the Reservation Summary or from the Front Desk.
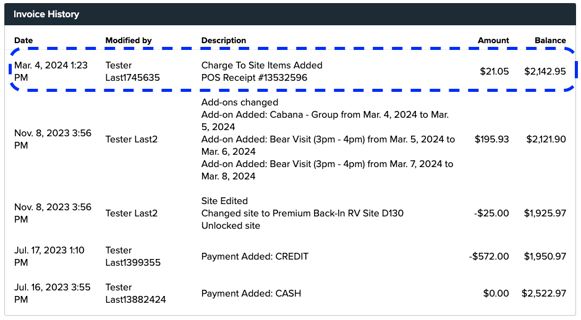
Charge to Site & Reservation Invoice History
- Completed Charge to Site transactions are found in the Reservation Invoice History.
- Transactions are clearly labeled, reflecting the Charge to Site amount in the Reservation's Outstanding Balance until payment is received.
View the example below.
Most Common FAQ:
Q: How does Charge to Site enhance the guest experience?
Charge to Site enhances guest convenience by eliminating the need for a credit card at every retail purchase. It streamlines payment processes, unlocks revenue opportunities, and optimizes operational efficiency.
Q: How do I add a customer to a sale using Charge to Site?
After adding products to the POS Shopping Cart, navigate to the Storefront Receipts section, click "Search Customers with Reservations," and select a checked-in guest using search fields like First/Last Name, Site Type, or Site Name/Number. Click the green "Add" button to include the guest in the sale.
Q: What is the best practice before proceeding with a Charge to Site transaction?
It is crucial to verify guest details. Upon completing the search, check reservation information, including First/Last Name, Site Type, and Site Number. Utilize this information to confirm the correct reservation, ensuring a smooth and error-free transaction process.
Q: How do I pay with Charge to Site?
Click the "Payment Type: Other" button, choose "Charge to Site" from the dropdown menu, and select whether to email the guest about the charge. Click the green "Submit Payment" button and print the receipt.
Q: What message will guests see at the bottom of their receipt after a Charge to Site transaction?
Guests will see a message acknowledging the completion of the Charge to Site transaction.
Q: Why is Charge to Site not an option in some cases?
Charge to Site works for checked-in reservations only. Ensure the customer is checked in from the Reservation tab of the Reservation Summary or from the Front Desk.
Q: Where can I find completed Charge to Site transactions and their details?
Completed Charge to Site transactions are found in the Reservation Invoice History, clearly labeled and reflecting the Charge to Site amount in the Reservation's Outstanding Balance until payment is received.